Cloud Clay SnowBalls
Do you fancy a little Festive Tutorial?
Having made a zillion little faces and hands in Cloud Clay over the last couple of years for some Nolitex exhibitions, I thought it would be fun to turn the idea into something for Christmas. White Cloud Clay seemed like the obvious choice, and snow balls the most suitable form for my creations.

Cloud Clay Snow Balls
I have a whole box full of various balls – cotton balls, polystyrene balls, Christmas baubles etc, and they are all suitable for this little project. What you will need is some White Cloud Clay, a ball (I used an old Christmas bauble for this one), some old dentistry tools or modelling tools, or anything you can use to create the faces with, a pair of scissors, Mica Powders and a Texture Mat. I used some Lisa Pavelka’s texture mats because they are really deep and very flexible.

Roughly roll out a ball of Cloud Clay and flatten it with your fingers to make a disc. Wrap this around the bauble until only the hanging thing at the top is visible.

Squish it around until you have an even covering and pinch and cut off off any excess, then roll in your hands until it is fairly smooth. Roughly cover the surface with texture from the Texture Mat. Don’t worry about covering every part, it is not necessary.

Press the Texture Mat around the ball
Leave the ball on the mat while you make the nose using a small piece of Cloud Clay rolled into an approximate cone.

Here comes the nose
Place the nose onto the ball, I like to put it fairly high up so there is plenty of room for the mouth below.

Poke nostrils with an embossing tool
Put some character into the nose by making some nostrils using an embossing tool. Sometimes I make pointy noses, sometimes they are big and blobby, but they all have nostrils, even the tiny little iddy biddy ones.

Form the eye sockets
One of my dentists tools has a lovely thin flat end which makes great eye sockets.

Spangles for eyes
As this is a SnowBall rather than an accurate representation of someone, I used some little flat backed spangles for the eyes, but beads and things work well too. You can use your tools to add detail to the eyes (bags and wrinkles etc!)

Mouths don’t have to be central
Take a small pinch of Cloud Clay and roll it into a ball, then roughly form it into a diamond shape and pop it on. I personally like to put it to one side rather than absolutely dead centre, this helps with the character of the face.

Making the mouth
Depending on the expression of the mouth I often begin with the embossing tool, and then move on to my trusty dentistry tools to create the shape.

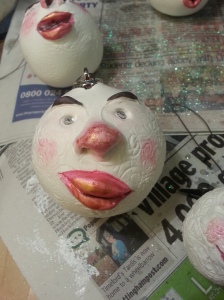
Here come the lips
A horizontal cut creates lips and you can pull them apart, add teeth, tongue etc, or simply pull up the sides to create a smile.

Smiles all the way
Tweaking the corners of the mouth produce even more character, making the face look slightly ironic, idiotic, dirty, silly or whatever you like. Sometimes flattening the corners of the bottom lip improve the face, but there are so many people out there who can create whatever expression they like, I hesitate to offer too much information. Most of my faces have a large amount of serendipity about them as they evolve with every tweak and mis- tweak that I make.
Add some small sausages of clay to make eyebrows. You might need to re-squish your SnowBall into shape using the texture mat as it may have deformed a little in the making.
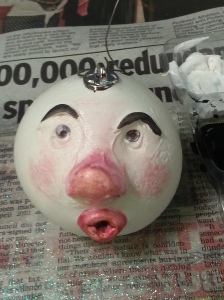
Hang it up to dry for 12 – 24 hours, then you can begin the fun of decorating him / her. Gender can be a curious thing with SnowBalls as they may start out male, but as you paint and add some sparkle they may become something else entirely. All mine look a bit like drag queens!

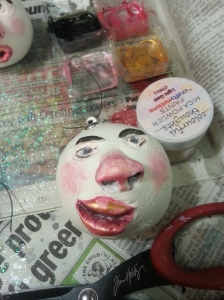
Mica Powders in a little water make wonderful paints
When your SnowBalls are dry, mix a little Mica Powder with a very tiny amount of water to make a paste and use this to begin painting your faces. I used 3 colours – Poppy Red, Light Gold and Soft Pink (I do have all of these in stock, but they may not yet be on the web site, so order any colour and then email me with the real colour that you want). You may want to build up colour with a number of layers, I like the look of the way the Mica Powders blend, but do let them dry properly between layers or you might just end up taking colour off again. The cheeks were painted using a tiny dab of colour tapped out with the finger to blend the edges.
Black acrylic paint makes the eyebrows stand out, but probably enhances the drag queen look!

Stitching Cloud Clay Snow Ball
Once you have the hang of the basic SnowBalls, why not try adding scarves like the unpainted one on the left, or legs and hands and a hat like the central SnowBall. The legs were made by covering a piece of wire with Cloud Clay and then attaching them to a wire running through the SnowBall from top to bottom You will probably need a polystyrene ball for this one. The top hat is made entirely from Cloud Clay, I used left over bits of white and painted them black, but you could use Black Cloud Clay instead.
I finished off my characterful SnowBalls with a layer of Sparkle Varnish with extra sprinkles of iridescent glitter, followed by a second layer of Sparkle Varnish.
I am really looking forward to seeing these characters on my Christmas Tree.
See you Tuesday for another Jewellery Maker show when I will be looking at Fusible Film, Angelina Fibres, Gleams and other things too. 9 am- 1pm.
ADENDUM
I thought you might like to see a few more in the making


Thanks for sharing this technique – I love these little heads/faces.
LikeLike
I think they are fabulous. Thank you for sharing the idea. x
LikeLike