More Adventures in Cloud Clay and Friendly Plastic
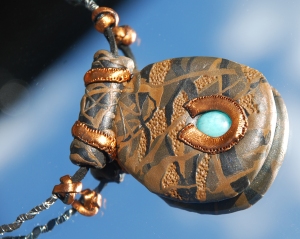
Sequin waste or Laser Mesh or Punchinella as it is known in the States is one of those tempting materials that attract because it comes in such lovely finishes, but it is also very obvious when you have used it. I had Laser Mesh in both of my kits for the last Jewellery Maker show. Choosing to use it as a mask in the first kit enabled me to create the pattern on this Cloud Clay pendant below. Mica Powders were brushed on to the exposed areas of Cloud Clay, and then the sequin waste is removed to reveal the white areas which were then coloured with copper Mica Powders. By adding a little bit of water I made a paint of the Mica Powders and when the clay was dry enhanced the colours using the Mica Powder paint.

Scribbledribbling different colours of Cloud Clay onto a base of fresh soft clay, then texturing parts of the design created contemporary pattern that could be quite masculine if necessary. Friendly Plastic “stitched” down with a needle tool enhances and contrasts with the matt finish of the clay.
If you roll up little balls of Cloud Clay and squish them with a clear acrylic block, making them stick to the underside of the block as you squish more and more little balls, you end up with a pattern of circles some of which touch and some of which don’t. Fill in the spaces by squishing in some more little balls in a different colour and you end up with a pattern that resembles the patterns on a Friesan cow! You can leave the sheet of clay like that or you can swirl the circles around with a cocktail stick or something similar (not metal or you will scratch your block). Squish the lot down again and you will have a thin sheet of coloured and patterned Cloud Clay to apply to a base clay shape.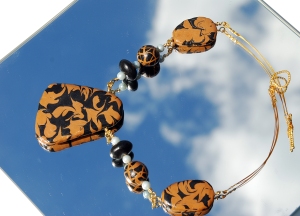
Above is the Terracotta and Black version, below the Black and White version. I used rubber O rings (found them on ebay) to make the links.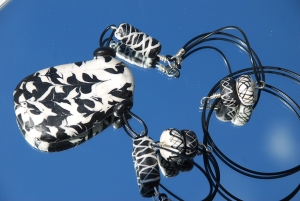
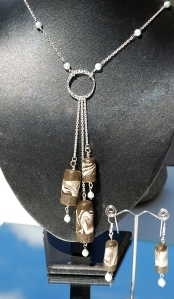
To Scribbledribble the beads, first make a cylinder bead in black Cloud Clay. Take a small amount of white and dip your finger into some water then mix that very small amount of water clinging to your finger into the clay to make it very soft and sticky. Tease out a little end and touch it to the base bead. You can then stretch and draw the soft clay out to make designs on your bead, or even write something if you feel confident. Once it is on it will not come off.

Scribbledribbled Cloud Clay pendant
Any accidents or left over bits can be twisted together to make a marbled effect as in the earrings below.
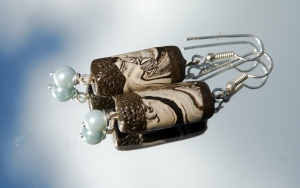
The dark chocolate brown colour of the Cloud Clay was made by mixing a little bit of black with some Terracotta Cloud Clay, and I liked the way it looked with the pale blue pearls. the pearls add a little bit of weight to the beads and make them hang better.
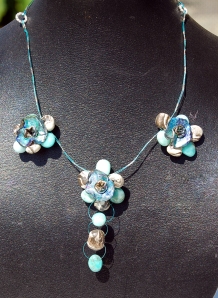
As I still had loads left of the brown marbled Cloud Clay I made a lot of little beads which became the flowers in the necklace below along with the gemstones. The flower centres are made using Friendly Plastic.
Do you remember feather icing? That is the technique I used on the Scribbledribbled bits of clay on this pendant, and then I added some twists of Friendly Plastic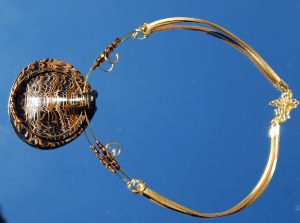
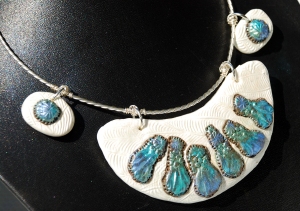
The flower mould I was given to use was rather pretty, but also very predictable. Everyone knows how to use a mould, so I thought I would put a twist on this and use elements of the mould rather than the whole thing. The bib necklace below is made of textured White Cloud Clay with applied pieces. Paint one of the petals of the mould with dry Mica Powder, then press in the clay so it fills only one of the petals and the centre of the flower. The Mica Powders act as a release agent and a colouring agent all at once, so the fragments lift out easily and can be “stitched” onto the base with a needle tool.
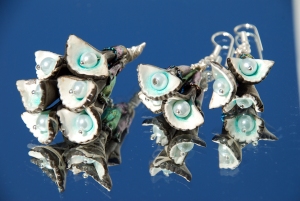
To make these little flowers I used two circles of contrasting Cloud Clay colours on top of each other. I cut each circle into 6 segments which were then curled up to form the basis of the flower shape. Indentations were made along the edge to add interest, and I brushed Mica Powders into the centres before inserting the pearls on headpins when the clay was dry. Friendly Plastic binds the end of each flower.
The second kit I was given involved Friendly Plastic and some rather lovely amethysts and pearls. It made me think of Medieval jewellery, so this little pendant that almost forms a cross on its beaded necklace was born. I used a technique I have talked about before – making a ball of Friendly Plastic and pressing a stone into it.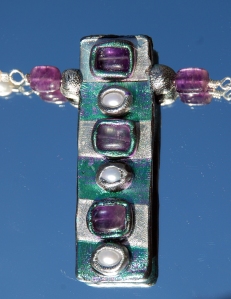
Moving forward 1000 years my second piece was much more contemporary. I had two different types of Laser Mesh in my kit, so i Ooozed with the black circle mesh, and used the star mesh as a mask to rub Gleams onto the surface of the Friendly Plastic. It is all pieced together with hot water, and enhanced by a twisted wire addition and the black rubber O rings again. To give weight to this and the pendant above, I added a back made of scrap Friendly Plastic. With this pendant I coloured it with Transfer Foil and textured it with a rubber texture mat so the reverse was also attractive.

Friendly Plastic and rubber O ring asymmetrical necklace
Having cut out the circle from my Friendly Plastic, I liked the bit that was left behind so made that into a pendant too.

Apologies to anyone who wanted to see exactly how to make bezel setttings from Friendly Plastic, the demo was cut a little short, but I will endeavour to put up a video for you on this technique.


Gorgous design colours.
Could you give a link to the mesh and sparkly thing you talked about on facebook please
LikeLike
Hello Bella, you can find the Laser Mesh here: http://www.rarebird.ltd.uk/Packs.html Not sure what you mean by the Sparkly Thing though – give me a clue!
LikeLike
Lovely work Liz
LikeLike
Thank you Kathy
LikeLike
Your jewellery is beautiful. I love the marbled effect, I think it looks great. I love the bib necklace too, that’s such a clever way of using a mould!
LikeLike
Thank you Francesca.
LikeLike